Hello guys, I hope you are fine. In this post we are going to see how to use SkinFiner plug-in for Photoshop, So without wasting any time let's start.
SkinFiner - Overview
SkinFiner plug-in is one of the best and commonly used plug-in in Photoshop and this is the best plugin for skin retouching, and you can basically adjust the face smoothness of the photo. I personally use this plug-in for retouch my photos in Photoshop and this plugin is very useful. If you are a good photographer then with the help of this plugin you can adjust so many things on your photos and this plugin is specially designed for skin adjustment in your photos you can adjust all the things like face's Smoothness, Brightness, Contrast and all other things in your photos. Here in this post we are going to know about how to use this plugin in Photoshop. So without wasting any time let's see all the steps how to use this plugin in Photoshop.
Although there are lots of tools are given in Photoshop, but this plugin is very useful while if you want to edit or retouch your skin in Photoshop in a small amount of time this plugin is very useful for you. Because this plugin is having a very easy interface and everyone can use this plugin very easily without any problem. If you have some knowledge about photoshop then it is very easy to use this plugin.
How To Use It ?
1. Make sure this plugin is successfully installed in your computer.
2. Now open Photoshop on your computer add any photo that you want to edit and to open SkinFiner plugin go to the Filter > Photo Toolbox > SkinFiner.
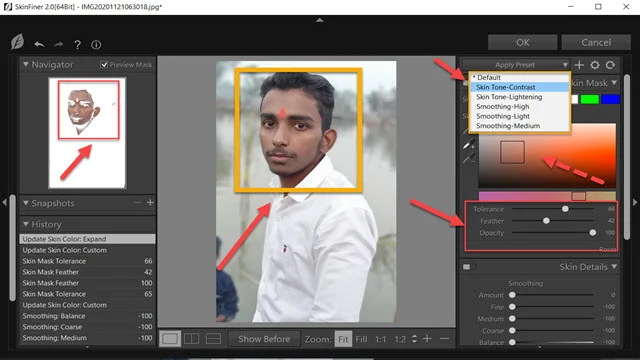
3. When this plug-in opens you can see, it has a simple interface and there is no any complication, and you can use this software very easily. Now, see in the given picture I already added a photo and with the help of this plugin I will edit my photo, here in this plug-in. You can see, already presets are given, and you can use this presets, or you can also customize the skin tolerance, feather and opacity. In the left corner you can see the selected areas of your skin that will show where all the effect will be applied so with the help of skin tolerance, feather and opacity you can adjust the navigator.
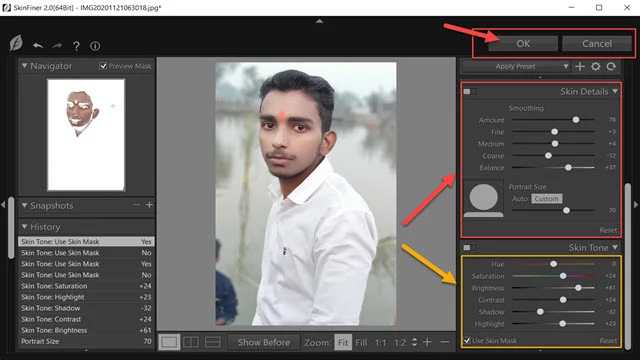
4. After adjusting the skin tolerance, feather and opacity for your skin navigation you can apply the given effects on your selected skin areas, you can adjust the amount of Smoothness and Skin Tone. There is no any complication in this software, you can adjust according to your need and that's it. In the skin tone option you can adjust the skin's hue, saturation, brightness, contrast, Shadows and highlights. After applying all these effects on your skin you can click ok to save it in your Photoshop.
5. So guys, here are the results before applying the SkinFiner plug-in in the Photoshop and after applying the SkinFiner plugin in the Photoshop in the given picture you can see there is a huge difference between the two photos. In the first one, you can see the skin is too dull and not very smooth but after using this plugin the skin looks so good and bright with some smoothness, So if you want to use this plugin with full of features you can also buy it from their official website, but I suggest you firstly you can try this then it's your choice.
That all for this post & if you like this post then you can follow us on social media platforms and if you have any query regarding this post you can comment in the comment box hope you all guys enjoy while reading this post.


Post a Comment
Please do not enter any spam link or any unwanted messages in the comment box.